tag #navbar-iframe { display: none !important; }
Showing posts with label Tricks. Show all posts

29/06/2013

Whatsapp account changer !!

>>>>>>>>>>>>>>>>>>>>>>>>>>Whatsapp account changer<<<<<<<<<<<<<<<<<<<<<<<<<<

2Lines for WhatsApp , its the name of the app which changes account of whatsapp in just one click.
2Lines for WhatsApp requires root access to work , its really usefull as you don't want pay whatsapp monthly or yearly payment.

2 Lines for Whatsapp allows you to use WhatsApp with different mobile phone numbers on the same device!

Two Lines for Whatsapp will save every WhatsApp account info you have and restore it automatically when you switch from one to another without needing registration or waiting for SMSs every time.

USE ON YOUR OWN RESPONSIBILITY!! Chorrasoft(its the name of developer group) won't take responsibility for any lost or corrupt data on your Whatsapp app.


Link: Here


Have some more reading , Whatsapp+

HOW TO BYPASS BLOCKED WEBSITES EASILY

>>>>>>>>>>>>>>>HOW TO BYPASS BLOCKED WEBSITES EASILY<<<<<<<<<<<<<<<<<<


Now as you can see in the screenshot , i have opened a blocked website .
So , how to bypass it .

It actually is really easy just add "s" in http(here)://websitename.extension

here is bypass result:

24/08/2012

How to maximize C++ in Windows 7


Below Is the step-by-step procedure how to install Turbo C++ on 64 bit or 32 bit Windows 7.
1. Install the software DOSBox ver 0.74 : download here
2. Create a folder,for example „Turbo“ (c:Turbo)
3. Download and extract TC into the Turbo folder (c:Turbo): download here
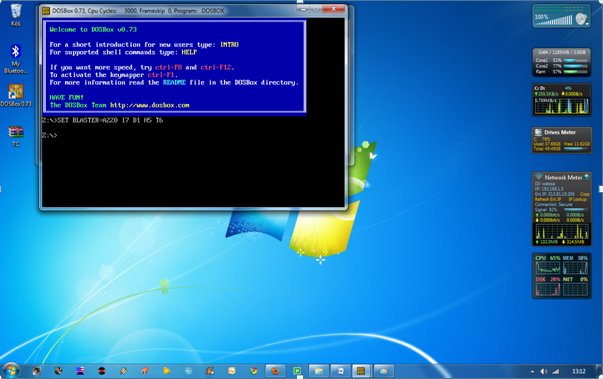
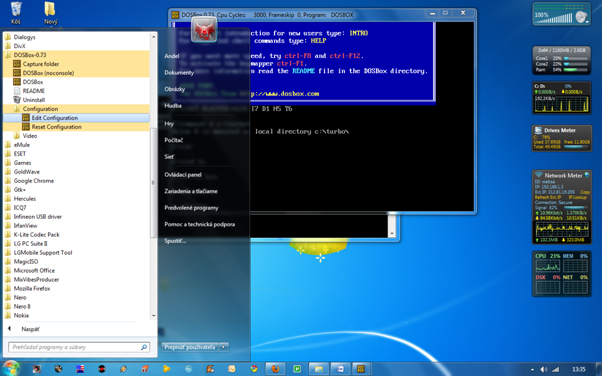
4. Run the DOSBox 0.74 from the icon located on the desktop:
steps to install dosbox 0 74 in window 7
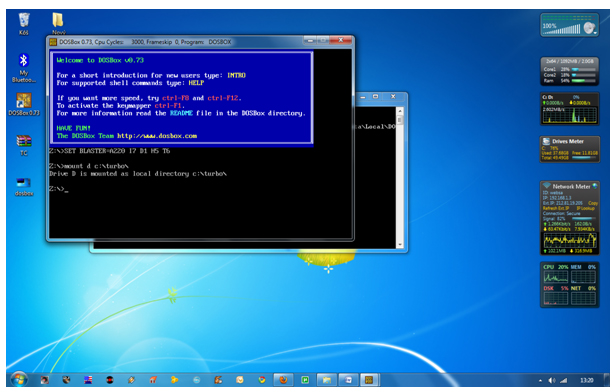
5. Type the following commands at the command prompt [Z]: mount d c:Turbo
[The folder TC is present inside the folder Turbo]
Now you should get a message which says:
Drive D is mounted as a local directory c:Turbo
install turbo c++ on Windows 7 64bit,turbo c++ in full screen ,c++,turbo c in fullscreen on windows 7,C++ tips and tricks,cool tips and tricks, how tos, c++ in  full screen on windows 7, TECHNOLOGY,
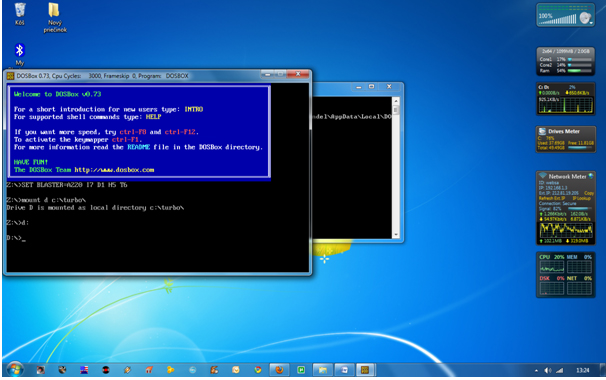
6. Type d: to shift to d:
install turbo c++ on Windows 7 64bit,turbo c++ in full screen ,c++,turbo c in fullscreen on windows 7,C++ tips and tricks,cool tips and tricks, how tos, c++ in  full screen on windows 7, TECHNOLOGY,
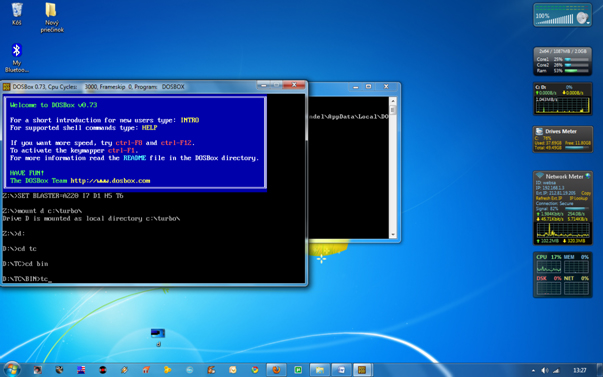
7. Next follow the commands below:
cd tc
cd bin
tc or tc.exe [This starts you the Turbo C++ 3.0]
install turbo c++ on Windows 7 64bit,turbo c++ in full screen ,c++,turbo c in fullscreen on windows 7,C++ tips and tricks,cool tips and tricks, how tos, c++ in  full screen on windows 7, TECHNOLOGY,
8. In the Turbo C++ goto Options>Directories>
Change the source of TC to the source directory
[D] ( i.e. virtual D: refers to original c:Turbo .
So make the path change to something
like D:TCinclude and D:TClib respectively )

How to start TurboC++ in the DOSBox automatically:

You can save yourself some time by having DOSBox automatically mount
your folders and start TurboC++:
For DOSBox versions older then 0.74 browse into program installation folder and open the
dosbox.conf file in any text editor. For version 0.74 go to Start Menu and
click on “Configuration” and then “Edit Configuration“.
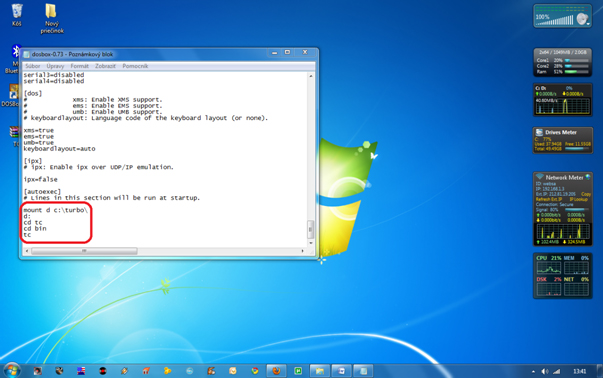
Then scroll down to the very end, and add the lines
which you want to automatically execute when DOSBox starts.
Automatically mount and start Turbo C++3.0 in DOSBox ver 0.74:
install turbo c++ on Windows 7 64bit,turbo c++ in full screen ,c++,turbo c in fullscreen on windows 7,C++ tips and tricks,cool tips and tricks, how tos, c++ in  full screen on windows 7, TECHNOLOGY,
Scroll down to the very end, and add the lines:
install turbo c++ on Windows 7 64bit,turbo c++ in full screen ,c++,turbo c in fullscreen on windows 7,C++ tips and tricks,cool tips and tricks, how tos, c++ in  full screen on windows 7, TECHNOLOGY,
Those commands will be executed automatically when DOSBox starts!
Please note:
Full screen: Alt and Enter
When you exit from the DosBox [precisely when u unmount the virtual drive where
Turbo C++ 3.0 has been mounted] all the files you have saved or made changes in
Turbo C++ 3.0 will be copied into the source directory
(The directory which contains TC folder)
Don’t use shortcut keys to perform operations in TC because they might be a
shortcut key for DOSBOX also . 
Eg : Ctrl+F9 will exit DOSBOX rather running the code 

12/08/2012

How to Install Windows 8 to a Tablet/Slate from USB

*** NOTE TO MODS: I ACCIDENTALLY HIT SUBMIT WHEN I PUT IN MY TITLE AS HOWTO. PLEASE RENAME OR DELETE & I WILL REPOST TO FOLLOW RULES ***

A lot of people have asked me in the past, how can I use my Samsung Series 7 Slate to run the latest Windows 8 (originally Dev Preview when I first released this) and actually I have been seeing it more often that people can't figure out how to get it on their Slate...

With that being said, I recommend you visit my updated post on my Blog that reflects Windows 8 RC here install & my blog contains other Windows 8 (and WP7) related content if you're bored. Otherwise to save you time, below is the steps/full blog post and a video created (This is my video from my YouTube Channel "TechMeShow", I permit the video being here) regarding making the USB Stick, which is old news but still people continue to ask and really get hundreds of views due to Google Searches.

ISO US-ENGLISH DOWNLOADS

Download 64-Bit US-EN Windows 8 Release Preview Here (ISO)

OR

Download 32-Bit US-EN Windows 8 Release Preview Here (ISO)

HOWTO Install Windows 8 Release Preview on MOST Tablet/Slate's

1). Download the edition of Windows 8 you want.
Tip: Download ISO from above.

2). Grab the Microsoft USB Disc Creator ('Should' use a USB Stick + Available USB Slot)
Tip Link: Microsoft USB Disc Creator Download Page. Video below.

3). After you use the Disc Creator, pop in the USB Stick to your computer and DO NOT RUN INSTALL ON WINDOWS 7 (We want it on a Tablet/Slate, remember?).

4). Now, reboot the tablet/slate, hit the Home Screen button only 1 time (give it a moment, don't rush, it'll happen) and select the USB Stick
Tip: To navigate up and down, select the left (or varies on device) Up/Down Volume Control and once selected, press the "Screen Lock".

5). Product Key: TK8TP-9JN6P-7X7WW-RFFTV-B7QPF

6). Follow the steps for installation and your set!


VIDEO: USB BOOTING FROM ISO
http://youtu.be/UdAcGtz6PFU

If you already knew all of this, terrific. However, again and not to brag, when I get at least 200 daily visits because people can't figure out how to install Windows 8 on a Tablet/Slate (yes pretty easy), I thought why not post it here because obviously not enough people are getting it.

08/07/2012

CREATE YOUR OWN FONTS IN WINDOWS

If you want to make your own fonts in window then
just follow these steps:
first go to----- start>Run & type here eudcedit and hit enter.
Small but very cool trick.


Or


If u r on Win 7 then just simply type eudcedit in start menu search bar.


How to remove Newfolder.exe

If you are using pendrive for data transfer at school, college or at your office or any where
you must have come across the VIRUS creates an exe file in your usb drive with the name New Folder.exe.
► WITH THIS VIRUS
Task manager is disabled.
Registry Editor is disabled.
Folder options not working.
Taking too much time for accessing pendrive.
Uses half of your computers processing power.

► Now you can easily remove this virus
Just download the tool from the link below.
Run this downloaded exe by double clicking on it.
Then click on “Delete Autorun.inf file”.

After that click on ” Remove virus from USB”. The virus will be removed from your pendrive.
with this tool you cal also restore your task manager, registry editor and other things which were disabled by virus
just click on “Restore Default Windows Settings”. thats it...........

NEWFOLDER.EXE

                    Click here to Free Download smart virus remover.

Use Your Keyboard As a Mouse


If you find it difficult to move the mouse or wish to have an alternative way to the mouse using the arrow keys on the numeric keypad follow the below steps.
Microsoft Windows users can enable the accessibility feature to move the mouse using their arrow keys by following the below steps. 

  1. Click Start, Settings, Control Panel.
  2. Within the Control Panel open Accessibility Options or Ease of Access
  3. Click the Mouse tab.
  1. Check the "Use Mouse Keys" check box.
  2. If you wish to increase the speed or change any other settings, click on the Settings button.
  3. Click Apply and then close out of the box.
After performing the above steps you will be able to used the numeric keypad as a mouse moving up, down, left, right, and all the diagonals. In addition, you may also use the center "5" key as a left click. 
Note: You must have the Number lock on for this feature to work by default. This can be changed through the settings.

20/06/2012

How to - Extend Wi-Fi coverage and eliminate dead zones


Most users having a wireless router at home or office usually complain of dead zones and low wireless connectivity ...
How to - Extend Wi-Fi coverage and eliminate dead zones
Most users having a wireless router at home or office usually complain of dead zones and low wireless connectivity in certain areas. This usually happens when you have a large room or multiple rooms, where a single wireless router cannot serve the entire area effectively. Upgrading to Wi-Fi ‘n’ routers or installing high-gain antennas could solve the problem, but the chances are remote when it comes to accessing the signals in a larger area or if you have many walls in between you and your router, especially. Adding Wi-fi signal repeaters can help, but this increases the overall cost of the hardware. 

A simpler and slightly cheaper solution would be installing additional wireless routers in other rooms, which will solve the problem. In this workshop, we show you how to configure multiple routers on the same network. Using this trick, you can have one single SSID throughout the entire network and stay in the same subnet too. Before you proceed, make sure you have an extra router handy with you. Any basic router would do since the goal is to spread the Wi-Fi network to a specific part of the house and not the whole house. You can invest in a few cheap Wi-Fi ‘g’ or ‘n’ routers, depending on how big your house is.

Choosing the right channel is very important


Let’s begin with an example to make you understand the network a bit better. You have a large home, which spreads across two or more rooms or floors. You have one wireless router, which is connected to the Internet gateway (either a DSL modem or a direct connection through your cable guy) and is placed in your living room. You can access this wireless network in your living room with ease, but your bedroom, kitchen, terrace or garden area has a very weak signal or you are unable to even get the network there. All you need is an additional router or more routers, which will pick up the primary network from another room and extend it further into its area. We shall take an example of a scenario where three routers are required to cover the area in the living room, the bedroom and the garden. Let’s call the primary wireless router in the living room as LR1, BR1 for the wireless router in the bedroom and GR1 for the one in the garden. Now we assume that LR1 is configured by default with SSID ‘RAHUL’ and a secure WPA2 password.

Let’s assume IP address is 192.168.0.1 and the DHCP server is enabled.  All clients now connecting to this router will be given IP addresses by this DHCP server on LR1 from 192.168.0.2, 192.168.0.3, and so on. Log in to your router using that IP in a browser and open the settings page.  Here, set the wireless network channel to ‘Channel 1’. Now, dig around a bit till you find the option to increase the antenna gain, and set it to the highest possible strength. Save and restart the router. LR1 is now configured.

Configuring LR1
Configuring LR1


Now let’s configure the second router BR1, which is placed in the bedroom. Once again, connect the router to a PC via the Ethernet or Wi-Fi network for configuration. Open the setup page of the router and start the setup wizard. Configure the WAN IP (Internet gateway) settings as ‘Dynamic’. This will receive an IP address from the primary router automatically. Next move on to configure the wireless network details, such as SSID and security password. Now enter the SSID the same as the primary router LR1 (in this case ‘RAHUL’). Enter the security type (in this case WPA2) and password, which is again identical to LR1. Next, set the channel number as channel 6, so that there is no overlapping of the channels between LR1 and BR1. Increase the antennal signal strength to maximum. Next, move on to the LAN settings and disable the DHCP server. Save the settings and the router will restart. Now BR1 is also configured. 


Now that both, LR1 and BR1 have been configured, GR1 also needs to be configured with the same settings as BR1, except for the channel number, which needs to be set as channel 11. If you want to configure more routers for additional coverage, you can follow the same settings procedure as that of BR1 and GR1, but keep in mind to decrease the channel overlapping as minimum as possible. A reference chart of the channel numbers and their overlapping range is given below. 
Make sure to secure your network


Once all the wireless routers are configured, all you need is to daisy chain the routers with each other using an Ethernet cable. For our setup, simply connect the WAN port of GR1 to one of the LAN ports of BR1 using an Ethernet cable and connect the WAN port of BR1 to any LAN port of LR1 using another Ethernet cable. Now once the entire network is switched on, LR1 will serve an IP address to BR1 and GR1 and to everyone connected to any of the three routers connected either via an Ethernet cable or via the wireless network. In this whole network, there is only one DHCP server, which will keep all the clients connected in the same subnet and since the SSID is identical on all the routers, one can roam between any rooms without having to switch the wireless network while moving.
The final setup
The final setup


You can increase or decrease the wireless antenna gain according to your choice, depending on the coverage area needed in the room. You can also keep the wireless channels set to automatic, if you wish and the router will automatically select the best suited channel by itself. But it is advised to keep the wireless channel numbers as specified in this article to decrease channel clutter and signal drops. The image here shows multiple routers used together with different channel numbers, so that they don’t overlap each other.

Yes, we know that wiring multiple routers with an Ethernet cable in different rooms can be a bit expensive and difficult, too. But this is the only way you can get maximum network speed and connectivity. If you want to compromise on expenses, then you could install DDWRT firmware (if your router is compatible) on the additional routers and set them up to connect to each other wirelessly. But since the wireless strength from LR1 would be weak, the signal would only degrade till you reached the last router in the chain. 

29/05/2012

Control Your Samsung Galaxy S2 with a Bluetooth Mouse


As it turns out you can actually control your Samsung Galaxy S2 with a bluetooth mouse. We tried with an old Dell mouse we had sitting around and although most of the functions worked, we had some problems with the scroll-wheel. That's not to say it wouldn't work better with a different mouse and we have heard that a Logitech mouse works better.  Still, it's quite impressive that the feature works straight out of the box without having to install any separate software on the phone.  To check out our quick experimentation with this feature, hit the Read More link or visit our Videos section.

06/04/2012

Unknown Awesome Notepad Funny Tricks You Might Have Missed


Here are some cool notepad tricks for you guys. Some of these are pranks, they may not work if they are pretty good with computers or you’re trying these on anyone whose background originates from computer field. Apart from these any kind of victims will do. This is just a fun article, just enjoy reading and I’m sure you’ll learn something new about notepad.

Notepad Diary :

Do you keep a diary (Or maybe a journal or something to keep a track of your daily activities and routines) Or do you wish to make notes where the notes keep the date automatically?Do you watch movies and keep a track of them??Like when you’ve watched it and stuff?? Well here is a cool trick that im gonna show you.Its upto you how you use it. All you need is notepad.
1) Open a blank notepad file.
2) Type .LOG in all caps at the top and hit enter.
3) Now save the file as you wish.
4) After closing the file, open it again and you will notice that the date & time is now listed on the second line.
5) You will also notice that the cursor is ready for you to start typing on the next line.
6) Now every time you open it, type something on the next line and then save it,close it, when you open it again, it will have automatically saved the date and time on the last line.
It keeps a running record of date and time for every save. Now you have a diary ! Have Fun !

Matrix Coding :

Next Trick that I’m gonna show you is to create similar to the Coded-Screen From the movie Matrix!! The screen where random numbers appear in the movie and a techie sits right in front of the computer and guides “Neo” through all troubles.Anyway if you don’t have an idea just have a look at the matrix screen from the following youtube link here.
Lets try to create a similar screen just by using a notepad.Just Copy paste the following code into your Notepad and save the file as Matrix.bat.”Matrix” is not necessary, you can save it with whatever name you wish but its important that you save it with .bat extension.
Here’s the code.
****************************
@echo off
color 02es
echo %random% %random% %random% %random% %random% %random% %random% %random% %random% %random%
goto start
****************************
This is nothing but usage of few simple notepad commands to create out Matrix screen.Let us understand what these commands do and how they function in brief.
Echo - Echos the screen.
Color – Displays the text content in the color that you mentioned.
:- This is similar to the “go-to” marker in C-Language. (Not a problem if you’re not experienced with C-Language. Just thought you should know)
%random – This prints a random number on the screen.
goto – this points that the function must be passed to “start” again to make it an indefinite loop.
Your screen must look something like this.

Fake Virus :

Deleting Files message to freak everyone out.
Just copy the following code and save it as a batch file like we spoke.
@echo off
cls
echo Fatal Error!! Your computer is under attack!!
pause
echo Deleting Files
pause
:files
echo !323%%%@#@GJFGG42JG 
echo !3424%@#%^&@52%@%gs 
echo !@$@^624@$6262$hG 
echo !@#4-07234&5*((6hkd 
echo !&^%78755&*%478*%$& 
echo !^$$68*$78()&4578 
echo !&8898*65$$566$68(9
goto files
If you want your victim to run this,save it in startup or you can just make him click your batch file and enjoy the look on your victim’s face.

Auto-Shutdown Code :

This is the real deal.This trick is so simple and so easy,but really leeches-out the life of even the toughest of the programmers making them wonder how to fix it.Now before you do this,just make sure this is only a prank and nothing more.I’ll tell you each and everything about this but you will have to make sure you restore the computer back to normal after using this trick. Trust me its fun,not at all dangerous.Its the kinda trick that is so easy and makes people wonder why is your computer acting so weird. Lets get started. just open notepad and type the following code.
msg * Fatal Error! Your Computer Will Shutdown in few Moments!*
shutdown -t
That’s it!!! Yep! That’s the code, as simple as it looks. Now save it as virus.bat, or anything you wish, just make sure it’s under .bat extension.Now here’s the real deal that makes this trick so annoying.Now take the batch file that you created and place it in the Windows startup.For those of you all who don’t know where startup is, no problemo! It’s in Start(Windows button on the left bottom of your screen), and there it will be, the windows startup.Just place the batch file in it and your trick is set to play a prank on your victim. The next time you switch on your computer your computer will look for the files in the startup directory and run them!! when your batch file is executed. It will display a message
“Fatal Error! Your Computer Will Shutdown in few Moments! “
You will next get a message box with a count-down for shutdown of your computer.You will have just a minute to remove the batch file from the startup directory to stop this from running again.Unless and until the file is removed from the startup . Your computer will shutdown every time you turn it on!! So don’t forget to remove the file from the startup directory. Just remember use this trick for fun purposes only( or you can use it in your college if you hate your lecturers, Because that’s what I do. :P Psssst,keep it a secret). Anyway I guess you have understood everything clearly.The outcomes of this trick is solely your responsibility.Have Fun!!


Read more: http://www.coolpctips.com/category/hacking-tips/#ixzz1rGqiDpvn