tag #navbar-iframe { display: none !important; }
Showing posts with label Important. Show all posts

24/08/2012

How to maximize C++ in Windows 7


Below Is the step-by-step procedure how to install Turbo C++ on 64 bit or 32 bit Windows 7.
1. Install the software DOSBox ver 0.74 : download here
2. Create a folder,for example „Turbo“ (c:Turbo)
3. Download and extract TC into the Turbo folder (c:Turbo): download here
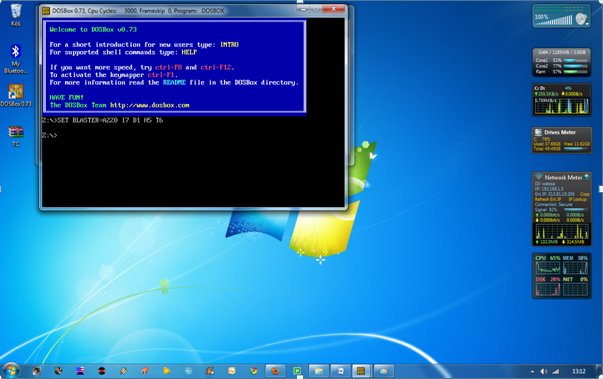
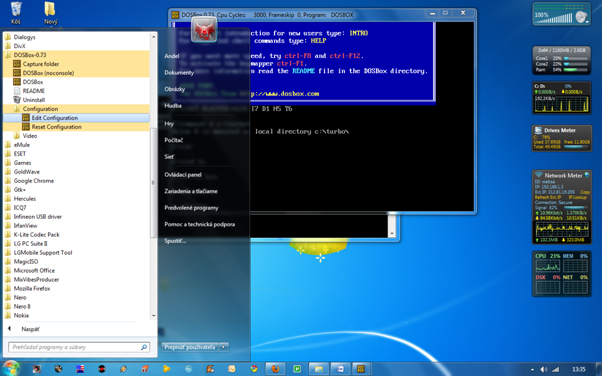
4. Run the DOSBox 0.74 from the icon located on the desktop:
steps to install dosbox 0 74 in window 7
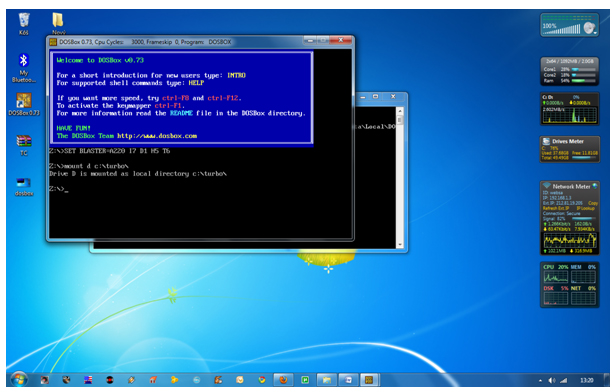
5. Type the following commands at the command prompt [Z]: mount d c:Turbo
[The folder TC is present inside the folder Turbo]
Now you should get a message which says:
Drive D is mounted as a local directory c:Turbo
install turbo c++ on Windows 7 64bit,turbo c++ in full screen ,c++,turbo c in fullscreen on windows 7,C++ tips and tricks,cool tips and tricks, how tos, c++ in  full screen on windows 7, TECHNOLOGY,
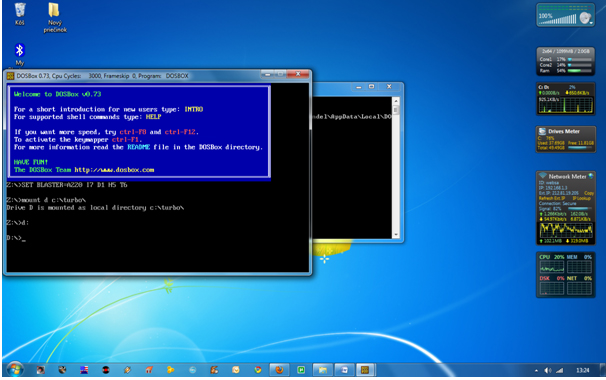
6. Type d: to shift to d:
install turbo c++ on Windows 7 64bit,turbo c++ in full screen ,c++,turbo c in fullscreen on windows 7,C++ tips and tricks,cool tips and tricks, how tos, c++ in  full screen on windows 7, TECHNOLOGY,
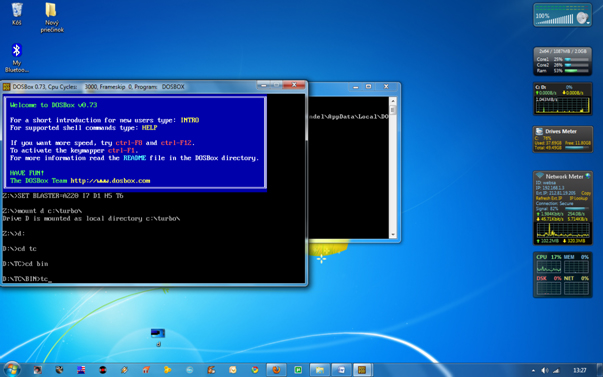
7. Next follow the commands below:
cd tc
cd bin
tc or tc.exe [This starts you the Turbo C++ 3.0]
install turbo c++ on Windows 7 64bit,turbo c++ in full screen ,c++,turbo c in fullscreen on windows 7,C++ tips and tricks,cool tips and tricks, how tos, c++ in  full screen on windows 7, TECHNOLOGY,
8. In the Turbo C++ goto Options>Directories>
Change the source of TC to the source directory
[D] ( i.e. virtual D: refers to original c:Turbo .
So make the path change to something
like D:TCinclude and D:TClib respectively )

How to start TurboC++ in the DOSBox automatically:

You can save yourself some time by having DOSBox automatically mount
your folders and start TurboC++:
For DOSBox versions older then 0.74 browse into program installation folder and open the
dosbox.conf file in any text editor. For version 0.74 go to Start Menu and
click on “Configuration” and then “Edit Configuration“.
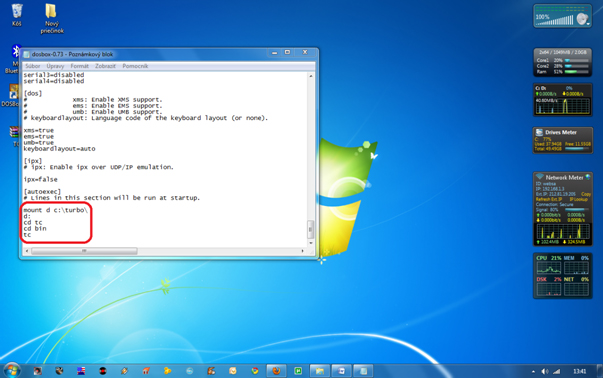
Then scroll down to the very end, and add the lines
which you want to automatically execute when DOSBox starts.
Automatically mount and start Turbo C++3.0 in DOSBox ver 0.74:
install turbo c++ on Windows 7 64bit,turbo c++ in full screen ,c++,turbo c in fullscreen on windows 7,C++ tips and tricks,cool tips and tricks, how tos, c++ in  full screen on windows 7, TECHNOLOGY,
Scroll down to the very end, and add the lines:
install turbo c++ on Windows 7 64bit,turbo c++ in full screen ,c++,turbo c in fullscreen on windows 7,C++ tips and tricks,cool tips and tricks, how tos, c++ in  full screen on windows 7, TECHNOLOGY,
Those commands will be executed automatically when DOSBox starts!
Please note:
Full screen: Alt and Enter
When you exit from the DosBox [precisely when u unmount the virtual drive where
Turbo C++ 3.0 has been mounted] all the files you have saved or made changes in
Turbo C++ 3.0 will be copied into the source directory
(The directory which contains TC folder)
Don’t use shortcut keys to perform operations in TC because they might be a
shortcut key for DOSBOX also . 
Eg : Ctrl+F9 will exit DOSBOX rather running the code 

21/07/2012

iOS 6 vs Jelly Bean vs Windows Phone 8


First Apple released iOS 6 at WWDC, then Microsoft put to fore the most awaited Windows Phone 8, and at the most recent Google I/O the Search giant...
iOS 6 vs Jelly Bean vs Windows Phone 8
First Apple released iOS 6 at WWDC, then Microsoft announced the most awaited Windows Phone 8, and recently at the Google I/O event, the newest Android iteration Jelly Bean (Android 4.1) was launched adding a new competitor to the two-horse mobile race. The new OS iterations were sheer improvements for Apple and Google to stay in the competition. On the other hand, Microsoft is here to prove its mettle and regain the ground that it has been losing on the mobile platform. It has tried hard and the feature set of the Windows Phone 8 will vouch for it. We decided to compare these three leading OSes, on the basis of what we know to be on paper, so far. 


User Interface
Apple’s iOS platform has been endowed with some nifty features over the year as it leaped forward with newer versions. It has ensured to keep its competitors on their toes. However, it is the user interface that still remains stagnant in the iOS 6, save minor visual changes. There hasn’t been much change and we still see the plain menu stretched across pages, and yes it lets you segregate apps into folders. Android ensures complete customizations, as you can pick your most favoured and frequently used widgets and place them on to homescreens as you wish. Now, it also allows you to resize these widgets. Microsoft’s Windows Phone 8 is quite similar to what we loved about Windows Phone 7.5. It offers a refreshing change with live tiles that can be resized.
Interface...

Interface...iOS 6, Jelly Bean, Windows Phone 8


We like the Windows Phone 8 UI, not just for its fresh, refreshing and sheer attractive looks, but also for the personalization of the lively tiles. Though many iOS loyalists may not agree, iOS UI looks too old, dull and boring; we would love to see an overhauled iOS UI.

Maps
With the new iOS 6, Apple has shrugged off its reliance on Google Maps. The maker of popular ‘i’ devices now has its own Maps app that is powered by TomTom. The company just didn’t lay out a mapping app, but added some useful features too. Android users can access Google Maps, which are integrated with Google search listings, something we all pretty much like. Microsoft has been trying hard to keep up with the competition, and plans to leave no stone unturned with its new Windows 8 OS for phone and tablets. To rebuild its losing mobile ground, the software giant even ditched its own Bing Maps to favour the Nokia Maps.

Jelly Bean, iOS 6 and Windows Phone 8, all support turn by turn navigation, 3D views, and traffic information. However, Jelly Bean and Windows Phone 8 support offline mode for Maps, while iOS 6 doesn’t. Also, all iOS 6 features would be made available for users in India. Here, we think iOS 6, is comparatively new and could need some tweaks, while we don’t at all doubt the capabilities of Google Maps and think that Nokia Maps are good at what they do.

Voice assistant
Talking about voice assistants, iOS 5 stirred waves in the tech arena with Siri last year. Siri was an instant hit, although it didn’t really work that well. However, Siri has been taking intensive lessons and is launched with some good-to-know improvements in the iOS 6. Siri-integration within iOS platform also gets tighter. Android has some voice enabled abilities, and is working on a full-fledged assistant too. The Jelly Bean update adds some improvements to its speech recognition and voice search abilities. It now brings along the knowledge graph and also a built-in speech recognizer. Microsoft has entered the battle fully armed to face its competitors, Google and Apple. It also allows voice commands to make calls, send texts, search the web and more.

Siri is famous and improving and Google has added some nifty improvements to its voice commands. Though Microsoft is armed with voice commands, we aren’t sure how well it would be trained to do so.
New maps for iOS...goodbye google maps

New maps for iOS...goodbye Google maps


Social network integration
‘Mobile’ and ‘social,’ walk hand in hand, and phone makers know how much social networks matter to the masses. Last year iOS 5 had Twitter integration and Apple added Facebook integration this year, to make the iOS 6 completely socially integrated. Jelly Bean follows suit, and you get integrated social networks like Facebook, Twitter, Dropbox, Picasa, its own Google+, and more.  Windows Phone 8, has been learning the tricks of the trade and has also integrated Facebook, Twitter, LinkedIn and its own Windows Live.

Seemingly, Google offers more integration, and yes of course it is also trying to pimp its Google+.  Apple and Microsoft have also integrated the two most popular social networks.
Newest flavour of Android...

Newest flavour of Android...


Mobile payment
‘Mobile payment’ is one promising aspect that leading mobile players plan to exploit to the fullest in the future. Apple has given NFC a miss, but stays in the game with its Passbook feature in the iOS 6. Passbook is a mobile wallet that keeps your debit cards, credit cards, tickets, and likewise in one place. It even offers updates to tickets in the passbook, and we may expect a lot happening in this space in the future. Google’s Jelly Bean brings in Google wallet, which is inclusive of mobile payments, rewards, offers, deals and more. The support for NFC ensures that Google’s mobile wallet is warming up for the mobile payment in the future. While Google has NFC and Apple has Passbook, Microsoft has both. Now, we don’t mean it has Passbook, but a similar feature called Wallet that stores all your credit/debit cards, rewards and more.

Calling features
Apple has added some cool calling features with the iOS 6, like ‘rejecting the call with a response.’ There are response templates, while one can even personalize their response. It also adds Do Not Disturb feature wherein the device doesn’t alert users about their calls/messages. However, the feature is smartly designed, so that if the number of calls from the same number exceeds 5 times, the phone recognizes the urgency and alerts the user. Android also allows users to create several replies, which can be sent as quick auto-replies, while declining a call and you can also filter out calls from specific people. Windows Phone has missed out on this bit. There is no Do not Disturb-kind feature nor the support for composing auto-response replies, while declining calls. However, it adds advanced filtering and call block options.

Apple and Google both offer call rejection functions, while Apple earns brownie points for its Do Not Disturb feature. Windows Phone 8 has some catching up to do here.

Video calling
Apple has spruced up its FaceTime, which can now be used on cellular networks, along with Wi-Fi. However, like everything else ‘Apple,’ its usage is restricted to ‘i’ devices. Google has Gmail and GTalk for Android (works on cellular network and Wi-Fi), that allows communicating with Gmail users on other device platforms. For Microsoft, it has to be Skype, the company had acquired the video calling service lately. Skype also supports other devices and platforms.

Google and Microsoft come with support for multiple platforms, while Apple’s FaceTime is limited to its platform.
Lively and attractive...

Lively and attractive...


Apps
Apple’s App Store is inundated with apps and the number is growing with each passing day. Google has been taking its Market seriously and has redesigned the Google Play store experience with the Jelly Bean version. It has even re-christened the Android Market as Google Play, to take the experience beyond Android apps. It is even selling the Nexus 7 through Google Play. As beginners, Microsoft has also been adding new apps from the time it was conceived.

Apple scores high, not just for the number of apps, but also for the quality, Apple strives to offer malware-free apps by laying dowm some strict rules. Google has a growing number of apps, but has failed at controlling malware. Microsoft is still at the nascent stage, taking apps into account, especially while comparing it to the other two giants.

Conclusion
Though Microsoft’s Windows Phone 8 appears to be promising, Apple’s iOS 6 and Google’s Android Jelly Bean still appear to be superior in many aspects. We can clearly see the efforts Microsoft has put in to keep up with the existing competition, and is striving to deliver neck to neck competition to the leading mobile OSes. However, it is nice to see another addition to the mobile race, which is until now dominated by only Apple and Google (we do miss BlackBerry). However, the overall performance delivered by all three OS iterations and how soon they reach the market will make quite a lot of difference. We still believe that Microsoft will have to do some catching up initially, but may completely allure masses sooner or later (this again would depend upon how it prices its smartphones).

14/07/2012

Samsung Network/Sim Unlock Code Generator/Patcher (SGS1/2/3)


Today we present a unified/streamlined and simple as (some words here) SIMLOCK/NetworkLock unlock code generator by stock+ team!

Mytool generates ORIGINAL unlock code without modyfying any files!(like most of unlocker program does)
or PATCHES The file directly, removing simlock without code!

Feel free to read README.NOW file and post your comments / infos here!


Link:

Download Version (1.4-GPU/Patch) With UI (as on screenshot)

If you like it, consider donation by clicking "donate" button in my profile 


Quote:
Version History:

- 1.4
* Galaxy S 2 flashing H/W 1.5+ support added.
* Unlocker confirmed to work also on Samsung Captivate (US version of SGS1), just choose I9000 when you want to generate code.

- 1.3
* Added direct patch method for Galaxy S 3 devices.
* Code optimization.
* More GFX card support added to hash cracking module.

- 1.2
* Added direct patch method for Galaxy S 2 devices (if you your code cant be generated or you dont have proper GPU, use this method - Read README.TXT before)
* Patching method confirmed working on HV 1.4+ version !

- 1.1
* Added GPU supported/not supported message

- 1.0
* Requires Windows .NET Framework v4
* Support for Galaxy S II Added
* Nice UI added
* ATI RV 7X0 card or nVidia 'CUDA' one (G80+) required to decrypt pass in this release. Next version will not use GPU but it will be slower. For these who dont have supported GPU, please wait.
* Warning: if generated code will not work for a first time when you are sure you typed it correctly, report it to us and stop trying, your phone will lock out after 3 unsuccessful unlock tries.

HOW TO RE-LOCK SAMSUNG GALAXY S (GT-I9000) (FOR WARRANTY PURPOSES ONLY)
Quote:
After you get the Unlock code using our tool, enter: *7465625*638*#
Pop-up box will show up. Complete the first field (MCC/MNC) with the network you want your phone locked to (for example 260 03 where 226 = Poland; 03 = orange etc.) and the second field (Control Key) with the Generated Unlock Code.
After pressing OK, your phone should relock.

READ THIS!

ALWAYS DO BACKUP OF EFS PARTITION BEFORE REPLACING FILES IN THIS DIRECTORY !!
I'M NOT TAKING RESPONSIBILITY FOR DATA LOSS!
REPLACING NV_DATA.BIN WITH BROKEN VERSION MAY CAUSE YOUR IMEI LOST! - YOU HAVE BEEN WARNED!
[


Enjoy and Happy unlocking!!
stock+ Team

08/07/2012

How to remove Newfolder.exe

If you are using pendrive for data transfer at school, college or at your office or any where
you must have come across the VIRUS creates an exe file in your usb drive with the name New Folder.exe.
► WITH THIS VIRUS
Task manager is disabled.
Registry Editor is disabled.
Folder options not working.
Taking too much time for accessing pendrive.
Uses half of your computers processing power.

► Now you can easily remove this virus
Just download the tool from the link below.
Run this downloaded exe by double clicking on it.
Then click on “Delete Autorun.inf file”.

After that click on ” Remove virus from USB”. The virus will be removed from your pendrive.
with this tool you cal also restore your task manager, registry editor and other things which were disabled by virus
just click on “Restore Default Windows Settings”. thats it...........

NEWFOLDER.EXE

                    Click here to Free Download smart virus remover.

05/07/2012

How to: Make your own USB OTG cable for an Android smartphon


Some high-end Android phones and most of today’s Android tablets support USB OTG (On-The-Go). This enables users to connect a standard USB input
How to: Make your own USB OTG cable for an Android smartphone
Some high-end Android phones and most of today’s Android tablets support USB OTG (On-The-Go). This enables users to connect standard USB input devices such as keyboards and mice, or even extend storage using a regular USB pen drive. However, only a few Android tablets are equipped with a USB host port (Type A Female connector), while no mobile phone is. Some mobile phone manufacturers ship USB host ports with their handsets while others have them as optional accessories, usually at a premium price.

In order to connect an Android phone to a standard USB device, you need to use a micro (or mini) USB to USB Type A Female convertor, but this should also be an OTG cable. A mini USB OTG cable is available in the market and can cost you around Rs.150 – Rs.300, but finding vendors who actually sell it is not easy. The ones that are available are not guaranteed to work. The case of the micro USB OTG cables is also similar.

USB connector types
USB connector types


In this workshop, we show you how you can build yourself an OTG cable (be it micro or mini) at almost no cost. Do note that the procedure mentioned here will involve hacking into your existing cable, and even a small blunder can potentially damage your cable or the device you use it with. Proceed with extreme caution as we take no responsibility for any damages to your device. Do this at your own risk. Furthermore, do take note of your Android specs and check carefully to see if it has OTG capabilities before trying out this workshop. Phones don’t need to be rooted as the stock ROM usually supports OTG in compatible handsets. Those who have installed third-party developer ROMs should check with the developers if the OTG feature is enabled in the kernel.
Slicing the connector sleeve


Since all phones usually ship with cables, we suggest you opt for a second one from the market to create the OTG cable. For those who are not able to find a similar cable, this workshop will also show you how you can use the same cable for regular and OTG modes. In the following procedure, we'll be using a micro USB cable that we’ll convert to be used with USB OTG.

Requirements:
  • A standard mini or micro USB cable
  • Some small, thin wires
  • A sharp knife
  • Soldering iron and solder wire
  • Wire cutter
  • Hot glue or any quick glue

Firstly, we need to slice open the micro USB connector end very carefully using a knife. The idea here is to cut the outer sleeve (length-wise) into two halves to reveal the connector inside. Be careful not to destroy the outer sleeve as we shall be glueing it back on after the work is done. 
A miniature switch
A miniature switch


After the sleeve is taken apart, some of you might find a whitish plastic mould covering the connector’s leads. This is for strengthening the cable to connector contacts, and its use depends from manufacturer to manufacturer. Those who have this mould will also have to cut through it to reveal the connector leads. On revealing the connector leads, you will find that it has five leads and not four. The usual four are power, data, data and ground, while the non-connected lead is sense. This lead needs to be grounded before connecting the cable for the phone to switch to OTG mode and sense a USB device connected to the interface.
The difference - circuit


Given above is the pin-out diagram for the micro and mini USB connector.
Pin 1: VCC
Pin 2: data
Pin 3: data
Pin 4 Not connected / unused
Pin 5: ground

In order to get the phone to go into OTG mode, we need to short Pins 4 and 5. You can either choose to short them permanently by soldering them together or soldering two wires to each of the pins and leading those outwards from the connector, which can then be soldered to a small switch. Using the switch, we can switch the cable between normal and OTG whenever needed. If you choose to short it permanently, you will have to cut off the connector at the other end (The Type A Male USB connector) and solder a Type B Female connector to accommodate a USB device. You can also choose to have a male to female USB convertor at that end. Here's what we did:
The connector and the sleeve


We chose to connect a small switch to the leads at Pin 4 and Pin 5 and glue the switch to the wire itself. This way, we could use the cable for both regular and OTG purposes. Next, we glued the connector sleeves back carefully using hot glue. Now the other end of the cable, which has a male USB connector, needed to be converted into a female. For this, we opted for the scrapped USB rear panel connector of a desktop PC. We soldered the wires of the USB connector to create a USB female-to-female convertor. Once done, we now have an OTG cable ready for use. Just to ensure we do not end up frying our phone, we used a multimeter to double-check any cable shortings during the soldering. Lastly, we connected the OTG cable to our Android (the Sony Ericsson Live with Walkman) and used a USB mouse with it. If your cable worked for you and your phone is compatible with OTG features, you can also connect a USB hub to the OTG cable and use a USB keyboard, mouse and pen drive together on the same Android device.
Micro USB Pin points


By following this workshop you can now conveniently use a pointing device to control your apps and games, use a keyboard to type e-mails and messages or use a pen drive to store or access media or large files. If you are lucky enough to find a micro USB connector and a Type A Female USB connector at an electronics store though, you can make your own OTG cable for under Rs.100.

20/06/2012

How to - Extend Wi-Fi coverage and eliminate dead zones


Most users having a wireless router at home or office usually complain of dead zones and low wireless connectivity ...
How to - Extend Wi-Fi coverage and eliminate dead zones
Most users having a wireless router at home or office usually complain of dead zones and low wireless connectivity in certain areas. This usually happens when you have a large room or multiple rooms, where a single wireless router cannot serve the entire area effectively. Upgrading to Wi-Fi ‘n’ routers or installing high-gain antennas could solve the problem, but the chances are remote when it comes to accessing the signals in a larger area or if you have many walls in between you and your router, especially. Adding Wi-fi signal repeaters can help, but this increases the overall cost of the hardware. 

A simpler and slightly cheaper solution would be installing additional wireless routers in other rooms, which will solve the problem. In this workshop, we show you how to configure multiple routers on the same network. Using this trick, you can have one single SSID throughout the entire network and stay in the same subnet too. Before you proceed, make sure you have an extra router handy with you. Any basic router would do since the goal is to spread the Wi-Fi network to a specific part of the house and not the whole house. You can invest in a few cheap Wi-Fi ‘g’ or ‘n’ routers, depending on how big your house is.

Choosing the right channel is very important


Let’s begin with an example to make you understand the network a bit better. You have a large home, which spreads across two or more rooms or floors. You have one wireless router, which is connected to the Internet gateway (either a DSL modem or a direct connection through your cable guy) and is placed in your living room. You can access this wireless network in your living room with ease, but your bedroom, kitchen, terrace or garden area has a very weak signal or you are unable to even get the network there. All you need is an additional router or more routers, which will pick up the primary network from another room and extend it further into its area. We shall take an example of a scenario where three routers are required to cover the area in the living room, the bedroom and the garden. Let’s call the primary wireless router in the living room as LR1, BR1 for the wireless router in the bedroom and GR1 for the one in the garden. Now we assume that LR1 is configured by default with SSID ‘RAHUL’ and a secure WPA2 password.

Let’s assume IP address is 192.168.0.1 and the DHCP server is enabled.  All clients now connecting to this router will be given IP addresses by this DHCP server on LR1 from 192.168.0.2, 192.168.0.3, and so on. Log in to your router using that IP in a browser and open the settings page.  Here, set the wireless network channel to ‘Channel 1’. Now, dig around a bit till you find the option to increase the antenna gain, and set it to the highest possible strength. Save and restart the router. LR1 is now configured.

Configuring LR1
Configuring LR1


Now let’s configure the second router BR1, which is placed in the bedroom. Once again, connect the router to a PC via the Ethernet or Wi-Fi network for configuration. Open the setup page of the router and start the setup wizard. Configure the WAN IP (Internet gateway) settings as ‘Dynamic’. This will receive an IP address from the primary router automatically. Next move on to configure the wireless network details, such as SSID and security password. Now enter the SSID the same as the primary router LR1 (in this case ‘RAHUL’). Enter the security type (in this case WPA2) and password, which is again identical to LR1. Next, set the channel number as channel 6, so that there is no overlapping of the channels between LR1 and BR1. Increase the antennal signal strength to maximum. Next, move on to the LAN settings and disable the DHCP server. Save the settings and the router will restart. Now BR1 is also configured. 


Now that both, LR1 and BR1 have been configured, GR1 also needs to be configured with the same settings as BR1, except for the channel number, which needs to be set as channel 11. If you want to configure more routers for additional coverage, you can follow the same settings procedure as that of BR1 and GR1, but keep in mind to decrease the channel overlapping as minimum as possible. A reference chart of the channel numbers and their overlapping range is given below. 
Make sure to secure your network


Once all the wireless routers are configured, all you need is to daisy chain the routers with each other using an Ethernet cable. For our setup, simply connect the WAN port of GR1 to one of the LAN ports of BR1 using an Ethernet cable and connect the WAN port of BR1 to any LAN port of LR1 using another Ethernet cable. Now once the entire network is switched on, LR1 will serve an IP address to BR1 and GR1 and to everyone connected to any of the three routers connected either via an Ethernet cable or via the wireless network. In this whole network, there is only one DHCP server, which will keep all the clients connected in the same subnet and since the SSID is identical on all the routers, one can roam between any rooms without having to switch the wireless network while moving.
The final setup
The final setup


You can increase or decrease the wireless antenna gain according to your choice, depending on the coverage area needed in the room. You can also keep the wireless channels set to automatic, if you wish and the router will automatically select the best suited channel by itself. But it is advised to keep the wireless channel numbers as specified in this article to decrease channel clutter and signal drops. The image here shows multiple routers used together with different channel numbers, so that they don’t overlap each other.

Yes, we know that wiring multiple routers with an Ethernet cable in different rooms can be a bit expensive and difficult, too. But this is the only way you can get maximum network speed and connectivity. If you want to compromise on expenses, then you could install DDWRT firmware (if your router is compatible) on the additional routers and set them up to connect to each other wirelessly. But since the wireless strength from LR1 would be weak, the signal would only degrade till you reached the last router in the chain.