Showing posts with label DIY. Show all posts
Showing posts with label DIY. Show all posts

29/06/2013
HOW TO BYPASS BLOCKED WEBSITES EASILY
>>>>>>>>>>>>>>>HOW TO BYPASS BLOCKED WEBSITES EASILY<<<<<<<<<<<<<<<<<<
 Now as you can see in the screenshot , i have opened a blocked website .
So , how to bypass it .
It actually is really easy just add "s" in http(here)://websitename.extension
here is bypass result:


So , how to bypass it .
It actually is really easy just add "s" in http(here)://websitename.extension
here is bypass result:

17/12/2012
Iphone Ios 6 themed new MiUi Rom (with Mi-Voice)
FAST & STABLE WITH MI-VOICE
Changelogs (v2.1 | v2.2) :
based on the current MIUI stock-rom
language (DE|EN) by Andy25 - many thx.
new dream-kernel with good battery-life
system new optimized
complete 100 % themed
Mi-Voice (iOS6 Edition v2.2 - coming soon)
3-way-reboot
iOS popup apk
iOS keyboard
new MIUI-bootanimation
Samsung email (included Widget) in iOS6 theme
iOS animated weather-lockscreen (by Moviestar)
9s Weather (is required for animated weather-lockscreen)
Fancy Widgets
AdAway (ad blocking)
Dropbox
Adobe Flashplayer
Easy mp3 Musicdownload
Youtube (themed)
and more ...
Small bug :
super video (video popup) have fc - I removed it in v2.2
Video:
Download:
http://foonode.net/file/5n6h (faster one)
OR
http://www.multiupload.nl/65LS0E3FTT
|
24/08/2012
How to maximize C++ in Windows 7
Below Is the step-by-step procedure how to install Turbo C++ on 64 bit or 32 bit Windows 7.
| 1. Install the software DOSBox ver 0.74 : download here |
| 2. Create a folder,for example „Turbo“ (c:Turbo) |
| 3. Download and extract TC into the Turbo folder (c:Turbo): download here |
| 4. Run the DOSBox 0.74 from the icon located on the desktop: |
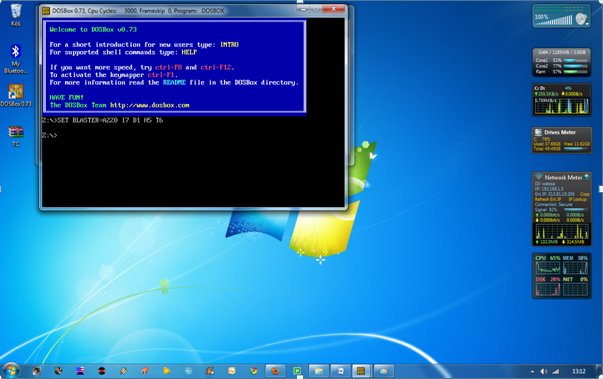 |
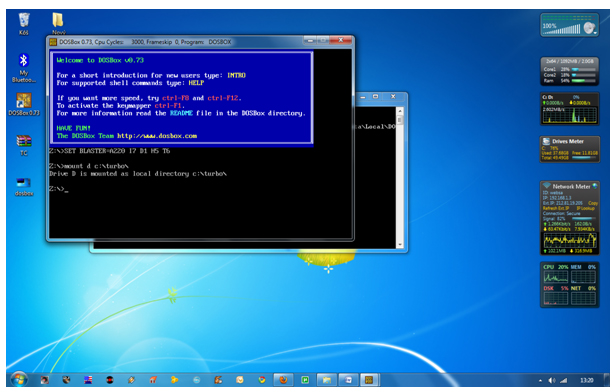
| 5. Type the following commands at the command prompt [Z]: mount d c:Turbo [The folder TC is present inside the folder Turbo] |
| Now you should get a message which says: Drive D is mounted as a local directory c:Turbo |
 |
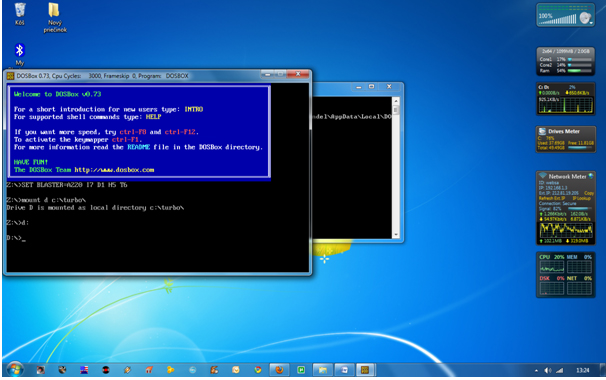
| 6. Type d: to shift to d: |
 |
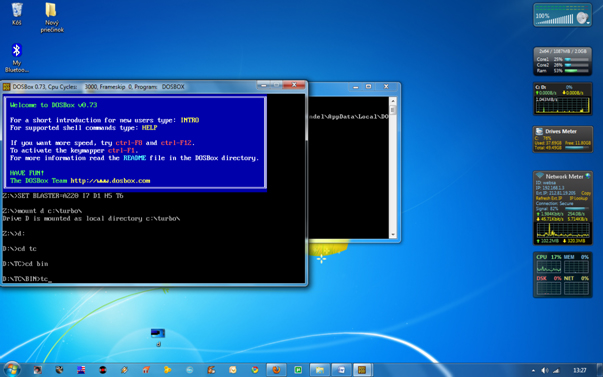
| 7. Next follow the commands below:
cd tc
cd bin
tc or tc.exe [This starts you the Turbo C++ 3.0]
|
 |
| 8. In the Turbo C++ goto Options>Directories> Change the source of TC to the source directory [D] ( i.e. virtual D: refers to original c:Turbo . So make the path change to something like D:TCinclude and D:TClib respectively ) |
How to start TurboC++ in the DOSBox automatically:
You can save yourself some time by having DOSBox automatically mount
your folders and start TurboC++: |
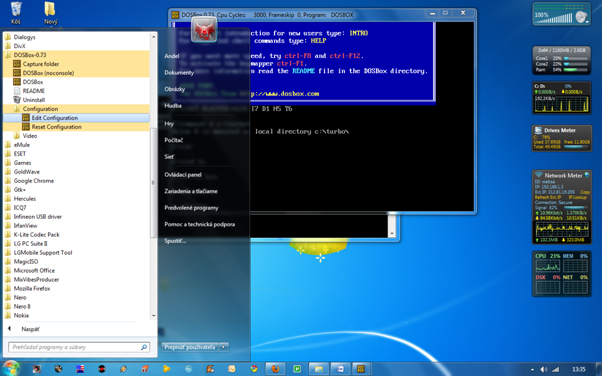
| For DOSBox versions older then 0.74 browse into program installation folder and open the dosbox.conf file in any text editor. For version 0.74 go to Start Menu and click on “Configuration” and then “Edit Configuration“. Then scroll down to the very end, and add the lines which you want to automatically execute when DOSBox starts. |
| Automatically mount and start Turbo C++3.0 in DOSBox ver 0.74: |
 |
| Scroll down to the very end, and add the lines: |
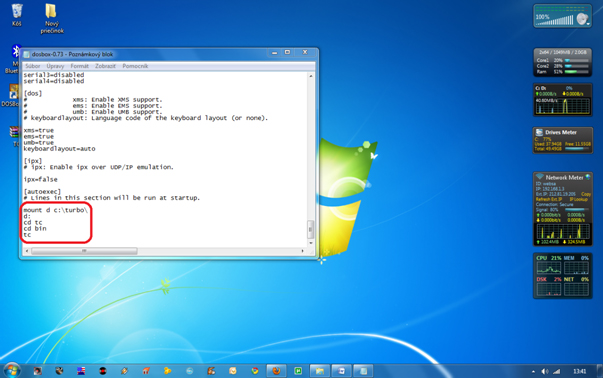 |
| Those commands will be executed automatically when DOSBox starts! |
| Please note:
Full screen: Alt and Enter
When you exit from the DosBox [precisely when u unmount the virtual drive where
Turbo C++ 3.0 has been mounted] all the files you have saved or made changes in Turbo C++ 3.0 will be copied into the source directory (The directory which contains TC folder)
Don’t use shortcut keys to perform operations in TC because they might be a
shortcut key for DOSBOX also . Eg : Ctrl+F9 will exit DOSBOX rather running the code |
13/08/2012
iOS 6 themed rom(Miui) for Galaxy s2 (really great

 Fast and Stable | The first Rom with Mi-Voice
 Changelogs (v2.1 | v2.2) :
- based on the current MIUI stock-rom
- language (DE|EN) by Andy25 - many thx.
- new dream-kernel with good battery-life
- system new optimized
- complete 100 % themed
- Mi-Voice (iOS6 Edition v2.2 - coming soon)
- 3-way-reboot
- iOS popup apk
- iOS keyboard
- new MIUI-bootanimation
- Samsung email (included Widget) in iOS6 theme
- iOS animated weather-lockscreen (by Moviestar)
- 9s Weather (is required for animated weather-lockscreen)
- Fancy Widgets
- AdAway (ad blocking)
- Dropbox
- Adobe Flashplayer
- Easy mp3 Musicdownload
- Youtube (themed)
and more ...
Small bug :
- super video (video popup) have fc - I removed it in v2.2
Download Rom :
MIUI iOS6 Edition v2.1 | Mirror
MIUI iOS6 Edition v2.2 (coming soon)
... enjoy

12/08/2012
How to Install Windows 8 to a Tablet/Slate from USB
*** NOTE TO MODS: I ACCIDENTALLY HIT SUBMIT WHEN I PUT IN MY TITLE AS HOWTO. PLEASE RENAME OR DELETE & I WILL REPOST TO FOLLOW RULES ***
A lot of people have asked me in the past, how can I use my Samsung Series 7 Slate to run the latest Windows 8 (originally Dev Preview when I first released this) and actually I have been seeing it more often that people can't figure out how to get it on their Slate...
With that being said, I recommend you visit my updated post on my Blog that reflects Windows 8 RC here install & my blog contains other Windows 8 (and WP7) related content if you're bored. Otherwise to save you time, below is the steps/full blog post and a video created (This is my video from my YouTube Channel "TechMeShow", I permit the video being here) regarding making the USB Stick, which is old news but still people continue to ask and really get hundreds of views due to Google Searches.
ISO US-ENGLISH DOWNLOADS
Download 64-Bit US-EN Windows 8 Release Preview Here (ISO)
OR
Download 32-Bit US-EN Windows 8 Release Preview Here (ISO)
HOWTO Install Windows 8 Release Preview on MOST Tablet/Slate's
1). Download the edition of Windows 8 you want.
Tip: Download ISO from above.
2). Grab the Microsoft USB Disc Creator ('Should' use a USB Stick + Available USB Slot)
Tip Link: Microsoft USB Disc Creator Download Page. Video below.
3). After you use the Disc Creator, pop in the USB Stick to your computer and DO NOT RUN INSTALL ON WINDOWS 7 (We want it on a Tablet/Slate, remember?).
4). Now, reboot the tablet/slate, hit the Home Screen button only 1 time (give it a moment, don't rush, it'll happen) and select the USB Stick
Tip: To navigate up and down, select the left (or varies on device) Up/Down Volume Control and once selected, press the "Screen Lock".
5). Product Key: TK8TP-9JN6P-7X7WW-RFFTV-B7QPF
6). Follow the steps for installation and your set!
VIDEO: USB BOOTING FROM ISO
http://youtu.be/UdAcGtz6PFU
If you already knew all of this, terrific. However, again and not to brag, when I get at least 200 daily visits because people can't figure out how to install Windows 8 on a Tablet/Slate (yes pretty easy), I thought why not post it here because obviously not enough people are getting it.
A lot of people have asked me in the past, how can I use my Samsung Series 7 Slate to run the latest Windows 8 (originally Dev Preview when I first released this) and actually I have been seeing it more often that people can't figure out how to get it on their Slate...
With that being said, I recommend you visit my updated post on my Blog that reflects Windows 8 RC here install & my blog contains other Windows 8 (and WP7) related content if you're bored. Otherwise to save you time, below is the steps/full blog post and a video created (This is my video from my YouTube Channel "TechMeShow", I permit the video being here) regarding making the USB Stick, which is old news but still people continue to ask and really get hundreds of views due to Google Searches.
ISO US-ENGLISH DOWNLOADS
Download 64-Bit US-EN Windows 8 Release Preview Here (ISO)
OR
Download 32-Bit US-EN Windows 8 Release Preview Here (ISO)
HOWTO Install Windows 8 Release Preview on MOST Tablet/Slate's
1). Download the edition of Windows 8 you want.
Tip: Download ISO from above.
2). Grab the Microsoft USB Disc Creator ('Should' use a USB Stick + Available USB Slot)
Tip Link: Microsoft USB Disc Creator Download Page. Video below.
3). After you use the Disc Creator, pop in the USB Stick to your computer and DO NOT RUN INSTALL ON WINDOWS 7 (We want it on a Tablet/Slate, remember?).
4). Now, reboot the tablet/slate, hit the Home Screen button only 1 time (give it a moment, don't rush, it'll happen) and select the USB Stick
Tip: To navigate up and down, select the left (or varies on device) Up/Down Volume Control and once selected, press the "Screen Lock".
5). Product Key: TK8TP-9JN6P-7X7WW-RFFTV-B7QPF
6). Follow the steps for installation and your set!
VIDEO: USB BOOTING FROM ISO
http://youtu.be/UdAcGtz6PFU
If you already knew all of this, terrific. However, again and not to brag, when I get at least 200 daily visits because people can't figure out how to install Windows 8
14/07/2012
Samsung Network/Sim Unlock Code Generator/Patcher (SGS1/2/3)
Today we present a unified/streamlined and simple as (some words here) SIMLOCK/NetworkLock unlock code generator by stock+ team!
Mytool generates ORIGINAL unlock code without modyfying any files!(like most of unlocker program does)
or PATCHES The file directly, removing simlock without code!
Feel free to read README.NOW file and post your comments / infos here!

Link:
Download Version (1.4-GPU/Patch) With UI (as on screenshot)
If you like it, consider donation by clicking "donate" button in my profile
Mytool generates ORIGINAL unlock code without modyfying any files!(like most of unlocker program does)
or PATCHES The file directly, removing simlock without code!
Feel free to read README.NOW file and post your comments / infos here!
Link:
Download Version (1.4-GPU/Patch) With UI (as on screenshot)
If you like it, consider donation by clicking "donate" button in my profile
Quote:
| Version History: - 1.4 * Galaxy S 2 flashing H/W 1.5+ support added. * Unlocker confirmed to work also on Samsung Captivate (US version of SGS1), just choose I9000 when you want to generate code. - 1.3 * Added direct patch method for Galaxy S 3 devices. * Code optimization. * More GFX card support added to hash cracking module. - 1.2 * Added direct patch method for Galaxy S 2 devices (if you your code cant be generated or you dont have proper GPU, use this method - Read README.TXT before) * Patching method confirmed working on HV 1.4+ version ! - 1.1 * Added GPU supported/not supported message - 1.0 * Requires Windows .NET Framework v4 * Support for Galaxy S II Added * Nice UI added * ATI RV 7X0 card or nVidia 'CUDA' one (G80+) required to decrypt pass in this release. Next version will not use GPU but it will be slower. For these who dont have supported GPU, please wait. * Warning: if generated code will not work for a first time when you are sure you typed it correctly, report it to us and stop trying, your phone will lock out after 3 unsuccessful unlock tries. |
HOW TO RE-LOCK SAMSUNG GALAXY S (GT-I9000) (FOR WARRANTY PURPOSES ONLY)
Quote:
| After you get the Unlock code using our tool, enter: *7465625*638*# Pop-up box will show up. Complete the first field (MCC/MNC) with the network you want your phone locked to (for example 260 03 where 226 = Poland; 03 = orange etc.) and the second field (Control Key) with the Generated Unlock Code. After pressing OK, your phone should relock. |
READ THIS!
ALWAYS DO BACKUP OF EFS PARTITION BEFORE REPLACING FILES IN THIS DIRECTORY !!
I'M NOT TAKING RESPONSIBILITY FOR DATA LOSS!
REPLACING NV_DATA.BIN WITH BROKEN VERSION MAY CAUSE YOUR IMEI LOST! - YOU HAVE BEEN WARNED
If you want to use it for working OTG adapter you have to connect the micro usb connector 4. pin to GND (5. pin).
Like this:

I made this mod on my adapter and it works!

First you have to open up the outter cover and carve the plastic around the micro usb pins. You can use multimeter to check the pinout.

After that solder the 4. pin to 5. pin with a piece of wire.


And finally glue back the outter cover.
Video:
So if you have not working adapter you can mod it, if you have suffice experience with electronic and proper tools.
Only do with your own risk!
05/07/2012
How to: Make your own USB OTG cable for an Android smartphon
Some high-end Android phones and most of today’s Android tablets support USB OTG (On-The-Go). This enables users to connect a standard USB input

Some high-end Android phones and most of today’s Android tablets support USB OTG (On-The-Go). This enables users to connect standard USB input devices such as keyboards and mice, or even extend storage using a regular USB pen drive. However, only a few Android tablets are equipped with a USB host port (Type A Female connector), while no mobile phone is. Some mobile phone manufacturers ship USB host ports with their handsets while others have them as optional accessories, usually at a premium price.
In order to connect an Android phone to a standard USB device, you need to use a micro (or mini) USB to USB Type A Female convertor, but this should also be an OTG cable. A mini USB OTG cable is available in the market and can cost you around Rs.150 – Rs.300, but finding vendors who actually sell it is not easy. The ones that are available are not guaranteed to work. The case of the micro USB OTG cables is also similar.

USB connector types
In this workshop, we show you how you can build yourself an OTG cable (be it micro or mini) at almost no cost. Do note that the procedure mentioned here will involve hacking into your existing cable, and even a small blunder can potentially damage your cable or the device you use it with. Proceed with extreme caution as we take no responsibility for any damages to your device. Do this at your own risk. Furthermore, do take note of your Android specs and check carefully to see if it has OTG capabilities before trying out this workshop. Phones don’t need to be rooted as the stock ROM usually supports OTG in compatible handsets. Those who have installed third-party developer ROMs should check with the developers if the OTG feature is enabled in the kernel.

Slicing the connector sleeve
Since all phones usually ship with cables, we suggest you opt for a second one from the market to create the OTG cable. For those who are not able to find a similar cable, this workshop will also show you how you can use the same cable for regular and OTG modes. In the following procedure, we'll be using a micro USB cable that we’ll convert to be used with USB OTG.
Requirements:
Firstly, we need to slice open the micro USB connector end very carefully using a knife. The idea here is to cut the outer sleeve (length-wise) into two halves to reveal the connector inside. Be careful not to destroy the outer sleeve as we shall be glueing it back on after the work is done.

A miniature switch
After the sleeve is taken apart, some of you might find a whitish plastic mould covering the connector’s leads. This is for strengthening the cable to connector contacts, and its use depends from manufacturer to manufacturer. Those who have this mould will also have to cut through it to reveal the connector leads. On revealing the connector leads, you will find that it has five leads and not four. The usual four are power, data, data and ground, while the non-connected lead is sense. This lead needs to be grounded before connecting the cable for the phone to switch to OTG mode and sense a USB device connected to the interface.

The difference - circuit
Given above is the pin-out diagram for the micro and mini USB connector.
Pin 1: VCC
Pin 2: data
Pin 3: data
Pin 4 Not connected / unused
Pin 5: ground
In order to get the phone to go into OTG mode, we need to short Pins 4 and 5. You can either choose to short them permanently by soldering them together or soldering two wires to each of the pins and leading those outwards from the connector, which can then be soldered to a small switch. Using the switch, we can switch the cable between normal and OTG whenever needed. If you choose to short it permanently, you will have to cut off the connector at the other end (The Type A Male USB connector) and solder a Type B Female connector to accommodate a USB device. You can also choose to have a male to female USB convertor at that end. Here's what we did:

The connector and the sleeve
We chose to connect a small switch to the leads at Pin 4 and Pin 5 and glue the switch to the wire itself. This way, we could use the cable for both regular and OTG purposes. Next, we glued the connector sleeves back carefully using hot glue. Now the other end of the cable, which has a male USB connector, needed to be converted into a female. For this, we opted for the scrapped USB rear panel connector of a desktop PC. We soldered the wires of the USB connector to create a USB female-to-female convertor. Once done, we now have an OTG cable ready for use. Just to ensure we do not end up frying our phone, we used a multimeter to double-check any cable shortings during the soldering. Lastly, we connected the OTG cable to our Android (the Sony Ericsson Live with Walkman) and used a USB mouse with it. If your cable worked for you and your phone is compatible with OTG features, you can also connect a USB hub to the OTG cable and use a USB keyboard, mouse and pen drive together on the same Android device.

Micro USB Pin points
By following this workshop you can now conveniently use a pointing device to control your apps and games, use a keyboard to type e-mails and messages or use a pen drive to store or access media or large files. If you are lucky enough to find a micro USB connector and a Type A Female USB connector at an electronics store though, you can make your own OTG cable for under Rs.100.
|
20/06/2012
How to - Extend Wi-Fi coverage and eliminate dead zones
Most users having a wireless router at home or office usually complain of dead zones and low wireless connectivity ...

Most users having a wireless router at home or office usually complain of dead zones and low wireless connectivity in certain areas. This usually happens when you have a large room or multiple rooms, where a single wireless router cannot serve the entire area effectively. Upgrading to Wi-Fi ‘n’ routers or installing high-gain antennas could solve the problem, but the chances are remote when it comes to accessing the signals in a larger area or if you have many walls in between you and your router, especially. Adding Wi-fi signal repeaters can help, but this increases the overall cost of the hardware.
A simpler and slightly cheaper solution would be installing additional wireless routers in other rooms, which will solve the problem. In this workshop, we show you how to configure multiple routers on the same network. Using this trick, you can have one single SSID throughout the entire network and stay in the same subnet too. Before you proceed, make sure you have an extra router handy with you. Any basic router would do since the goal is to spread the Wi-Fi network to a specific part of the house and not the whole house. You can invest in a few cheap Wi-Fi ‘g’ or ‘n’ routers, depending on how big your house is.

Choosing the right channel is very important
Let’s begin with an example to make you understand the network a bit better. You have a large home, which spreads across two or more rooms or floors. You have one wireless router, which is connected to the Internet gateway (either a DSL modem or a direct connection through your cable guy) and is placed in your living room. You can access this wireless network in your living room with ease, but your bedroom, kitchen, terrace or garden area has a very weak signal or you are unable to even get the network there. All you need is an additional router or more routers, which will pick up the primary network from another room and extend it further into its area. We shall take an example of a scenario where three routers are required to cover the area in the living room, the bedroom and the garden. Let’s call the primary wireless router in the living room as LR1, BR1 for the wireless router in the bedroom and GR1 for the one in the garden. Now we assume that LR1 is configured by default with SSID ‘RAHUL’ and a secure WPA2 password.
Let’s assume IP address is 192.168.0.1 and the DHCP server is enabled. All clients now connecting to this router will be given IP addresses by this DHCP server on LR1 from 192.168.0.2, 192.168.0.3, and so on. Log in to your router using that IP in a browser and open the settings page. Here, set the wireless network channel to ‘Channel 1’. Now, dig around a bit till you find the option to increase the antenna gain, and set it to the highest possible strength. Save and restart the router. LR1 is now configured.

Configuring LR1
Now let’s configure the second router BR1, which is placed in the bedroom. Once again, connect the router to a PC via the Ethernet or Wi-Fi network for configuration. Open the setup page of the router and start the setup wizard. Configure the WAN IP (Internet gateway) settings as ‘Dynamic’. This will receive an IP address from the primary router automatically. Next move on to configure the wireless network details, such as SSID and security password. Now enter the SSID the same as the primary router LR1 (in this case ‘RAHUL’). Enter the security type (in this case WPA2) and password, which is again identical to LR1. Next, set the channel number as channel 6, so that there is no overlapping of the channels between LR1 and BR1. Increase the antennal signal strength to maximum. Next, move on to the LAN settings and disable the DHCP server. Save the settings and the router will restart. Now BR1 is also configured.
|


Subscribe to:
Posts (Atom)